


You are looking at the documentation of a prior release. To read the documentation of the latest release, please
visit here.
New to Voyager? Please start here.
Exposing HAProxy Stats
To expose HAProxy stats, please use the following annotations:
| Keys | Value | Default | Description |
|---|---|---|---|
| ingress.appscode.com/stats | bool | "false" | Required. If set, HAProxy stats will be exposed |
| ingress.appscode.com/stats-port | integer | "56789" | Optional. Port used to expose HAProxy stats |
| ingress.appscode.com/stats-secret-name | string | x | Optional. Secret used to provide username & password to secure HAProxy stats endpoint. Secret must contain keys username and password |
If ingress.appscode.com/stats: "true" annotation is set, a ClusterIP service voyager-<ingress-name>-stats will be
created by Voyager operator. ClusterIP type service used to expose HAproxy stats. This ensures stats endpoint
is not exposed to the internet.
Accessing HAProxy Stats
To access the HAPRoxy stats webpage, you can use port forwarding feature in kubectl. This article shows you the relevant stepos using a minikube cluster.
Before You Begin
At first, you need to have a Kubernetes cluster, and the kubectl command-line tool must be configured to communicate with your cluster. If you do not already have a cluster, you can create one by using Minikube.
Now, deploy Voyager operator following instructions here.
Note that the yaml files that are used in this tutorial, stored in docs/examples folder in GitHub repository appscode/voyager.
To keep things isolated, this tutorial uses a separate namespace called demo throughout this tutorial. Run the following command to prepare your cluster for this tutorial:
$ kubectl create namespace demo
namespace "demo" created

$ kubectl get ns
NAME          STATUS    AGE
default       Active    45m
demo          Active    10s
kube-public   Active    45m
kube-system   Active    45m
Create Ingress
We are going to use a nginx server as the backend. To deploy nginx server, run the following commands:
kubectl run nginx --image=nginx -n demo
kubectl expose deployment nginx --name=web --port=80 --target-port=80 -n demo
Now create Ingress ing.yaml
$ kubectl apply -f https://raw.githubusercontent.com/appscode/voyager/7.0.0/docs/examples/monitoring/stats-ing.yaml
ingress "stats-ing" created
$ kubectl get pods,svc -n demo
NAME READY STATUS RESTARTS AGE
po/nginx-8586cf59-6hbx8 1/1 Running 0 4m
po/voyager-stats-ing-6cb494cc6d-q2rnn 1/1 Running 0 39s
NAME TYPE CLUSTER-IP EXTERNAL-IP PORT(S) AGE
svc/voyager-stats-ing NodePort 10.110.126.89 <none> 80:31019/TCP 39s
svc/voyager-stats-ing-stats ClusterIP 10.107.28.13 <none> 56789/TCP 39s
svc/web ClusterIP 10.106.250.209 <none> 80/TCP 4m
$ minikube ip
192.168.99.100
$ curl http://192.168.99.100:31019 -H "Host:voyager.appscode.test"
<!DOCTYPE html>
<html>
<head>
<title>Welcome to nginx!</title>
<style>
body {
width: 35em;
margin: 0 auto;
font-family: Tahoma, Verdana, Arial, sans-serif;
}
</style>
</head>
<body>
<h1>Welcome to nginx!</h1>
<p>If you see this page, the nginx web server is successfully installed and
working. Further configuration is required.</p>
<p>For online documentation and support please refer to
<a href="http://nginx.org/">nginx.org</a>.<br/>
Commercial support is available at
<a href="http://nginx.com/">nginx.com</a>.</p>
<p><em>Thank you for using nginx.</em></p>
</body>
</html>
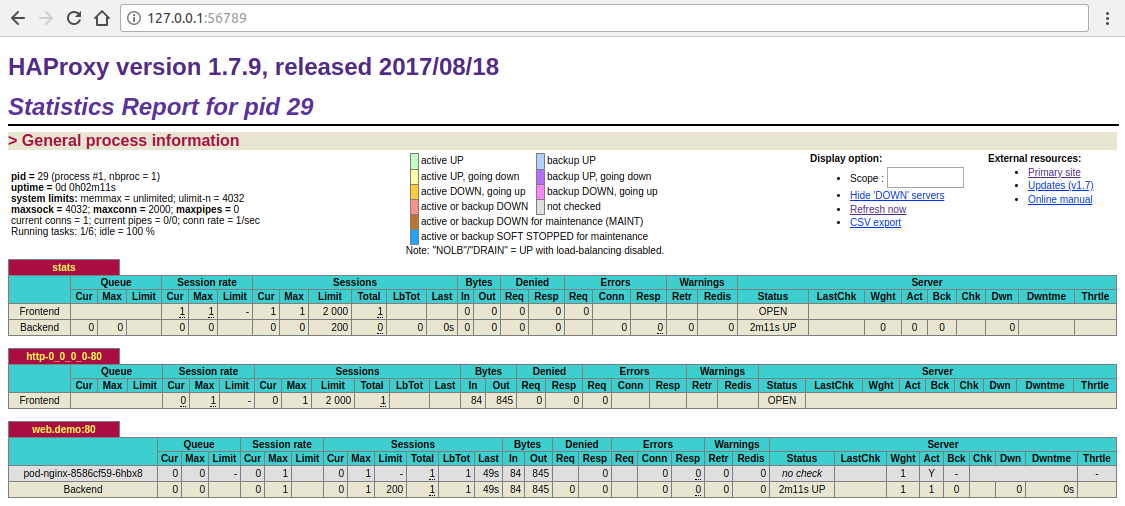
$ kubectl port-forward voyager-stats-ing-6cb494cc6d-q2rnn -n demo 56789:56789
Forwarding from 127.0.0.1:56789 -> 56789
Handling connection for 56789
Cleaning up
To cleanup the Kubernetes resources created by this tutorial, run:
$ kubectl delete ns demo
namespace "demo" deleted
Next Steps
- To monitor your HAProxy pods using builtin Prometheus scraper, visit here.
- To monitor your HAProxy pods using CoreOS Prometheus Operator, visit here.
- To monitor Voyager operator using Prometheus, visit here.